A decade ago, you’d be sending these files as an email attachment or link from a site like Megaupload or MediaFire. Let’s all rejoice that those days are behind us. A popular feature on those sites of old that has carried over into today’s popular sharing sites, like Pastebin, is the ability to invalidate your link or unshare your file after a set period of time. This isn’t something we can do via email. However, it’s a feature that many people aren’t aware of in Google Drive. Some sensitive files shouldn’t live on the Internet forever. In this article, let’s talk about how you can set an expiration date on your shared file access in Google Drive.
Limitations of Shared File Access
Expiration in Google Drive
It’s important to know that this feature is only available for accounts under a paid G Suite organization. This means that standard Google accounts or accounts using the free legacy version of G Suite can’t utilize shared file access expiration. Users who are not under a paid G Suite organization can still have files shared to them with an expiration, but this requirement must be met to set the expiration of shared file access in Google Drive. If you work for a company that assigns you your own email account through a custom Gmail domain, there’s a good chance that you have access to this feature through that account.
How to Set Up Shared File Access
Expiration in Google Drive
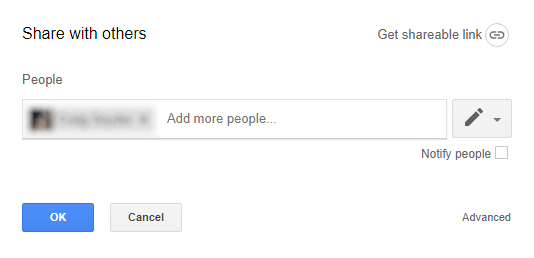
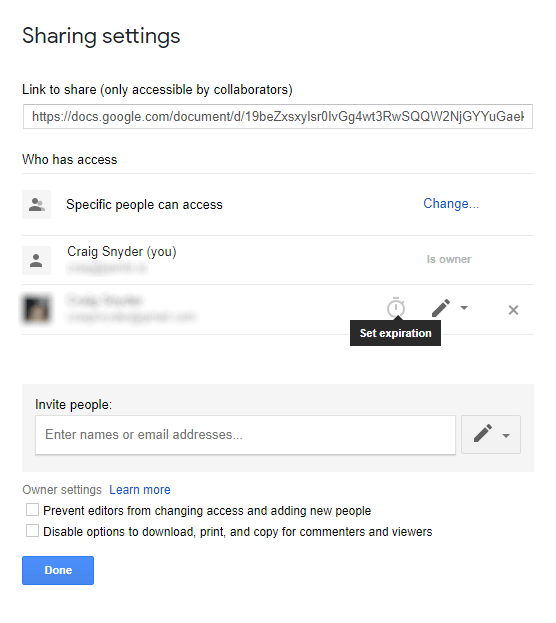
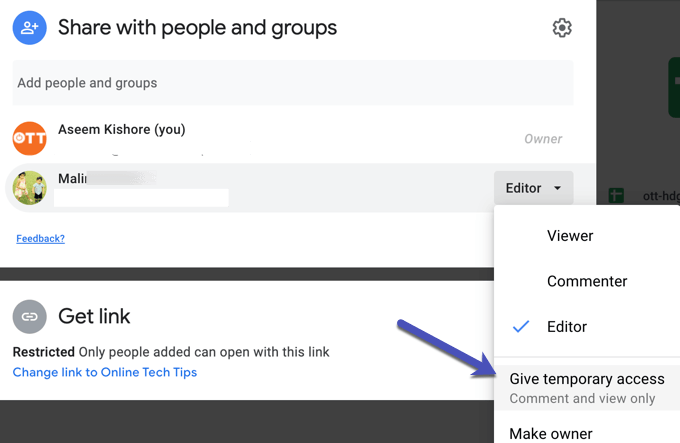
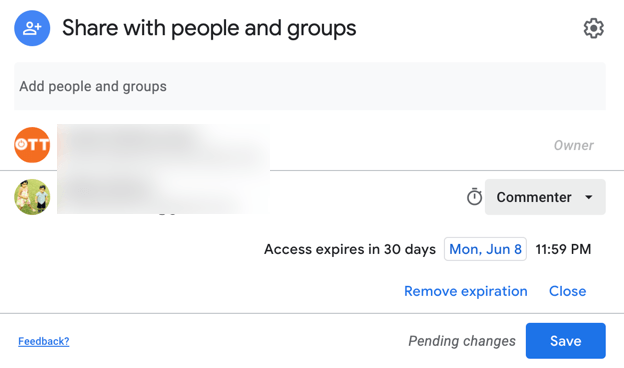
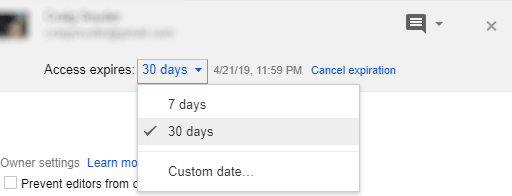
Naturally, the first step of this process is to actually share a file with someone. To share one of your files in Google Drive, the easiest way is to access the file and then look in the top-right corner for the large blue Share button—you can’t miss it. Click on it and a lightbox will pop up that will allow you to type in a list of email addresses to share your file with. Click the OK button to send out your invitation(s) to share your file when you’re ready. After, you’ll want to reopen this same file and again click on the blue Share button or right-click on the file and click on Share. This time, click on Advanced in the bottom-right corner of the lightbox. Here, if you hover over the row of any of the users you’re sharing the file with, a timer icon will appear that reads “Set expiration” when you hover it. If you don’t see this icon, it could mean that you aren’t using an account under a compatible G Suite organization. If you do, click on it. Another reason you may not see it is because Google has updated the GUI interface for Google Drive. Instead, you may have to click on the little drop down next to their name and then click on Give temporary access. Now you’ll see a window like the two below. The top image is the newer version of Google Drive and most likely what you’ll encounter. This should cause the access expiration options to appear. Clicking on the dropdown menu will reveal common dates of 7 days and 30 days, or you can click on Custom date… to set your own expiration date. Setting a custom date will allow you to select a day from a calendar view. The only catch is that you’re not able to select a time, only a date—the file will expire a minute before midnight on any day that you select. Once you’re happy with how you’ve configured your shared file access expiration, click Save changes and then Done. That’s it! An important thing to keep in mind is that users will still be able to effectively keep your file past its expiration date by downloading it. To prevent this, you’ll want to set their access to only allow them to view the file (not edit it) and enable the “Disable options to download, print, and copy for commenters and viewers” option. If you have an account under a non-legacy G Suite organization, shared file access expiration is one of the many underused perks that you can put to great use. This only takes a matter of seconds, so don’t let those sensitive files hang around forever! In the case that G Suite isn’t secure enough or up to your standards, we’ve alternatively got a great guide on how to set up your own personal cloud storage. Check it out for complete control over your cloud sharing.

