In this post, I will break down all the options and scenarios for uninstalling Windows 7 from a computer that already had an operating system, such as Windows XP or Vista. If you want further information about Windows 7, check out my previous post on the differences between the different versions of Windows 7.
The first thing to note is that you can only upgrade a Windows Vista computer to Windows 7, not Windows XP. If you already have XP, you will have to do a clean install of Windows 7. However, if you have a computer with Windows XP and you install Windows 7 ON TOP of Windows XP, then you can actually revert back to XP. So if you have a computer with XP and you want to go to Windows 7, do NOT format your hard drive! Just pop in the disk, boot from the CD and install Windows 7. In this case, Windows created a folder called Windows.old in the root of the Windows partition with the previous operating system and data. You can follow the step by step instructions on how to revert to a previous installation of Windows after installing Windows 7. Now let’s say you upgraded Windows Vista to Windows 7. In this case, you are CANNOT revert back to Windows Vista. It’s a one way process and so you should be aware of this when going from Vista to Windows 7. In order to go back to Vista, you will have to perform a clean install of Windows Vista, meaning you will have to backup all your data and then restore it manually later. You will also have to reinstall all of your programs. Finally, if you installed Windows 7 on a separate partition to create a multi-boot system and now want to remove Windows 7, you most likely can remove it without messing anything up.
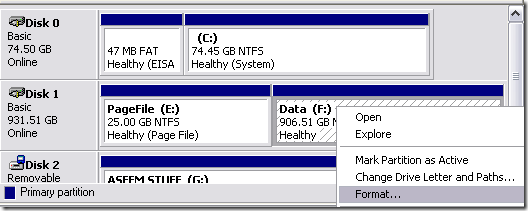
Note that this will only work if the older version of Windows was installed first. If you installed Windows 7 and then installed Windows XP or Vista to create a multi-boot system, you cannot remove Windows 7. As long as you installed Windows 7 as the second OS, you first have to boot your computer into the older version of Windows and either delete or format the partition with Windows 7 installed on it. You have to do this so that the older version of Windows can reclaim the disk space and use it. You can do this by right-clicking on My Computer, choosing Manage and then clicking on Disk Management in the left hand list. Right-click on the volume where Windows 7 is installed and choose Format or Delete Volume.
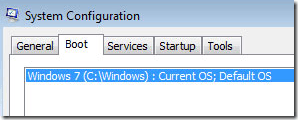
Now you have to remove Windows 7 from the multi-boot screen. You can do this by going to Start, Control Panel, System and Security, Administrative Tools, System Configuration. Click on the Boot tab and click on the listing for Windows 7. Click Delete and then Restart.
That’s it! Once you format the Windows 7 partition and remove it from the multi-boot screen, you will be able to restart your computer and have it automatically load the previous installation of Windows! Enjoy!


