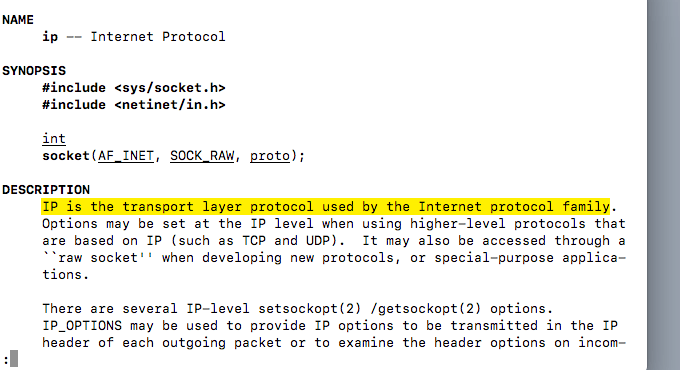
It helps to define basic terminology first. At the very least, it allows you to develop a framework on which to build your understanding. TCP/IP is no exception. This section on terminology is not an exhaustive list. It’ll give you a basis on which to start your journey into understanding networking and how to configure TCP/IP files on Linux.
The *Nix World
Have you ever wondered what *nix means? What about how Unix and Linux are related (let alone all of the various versions of each)? *nix is a method of referencing Linux and/or Unix (or any distribution) using a wildcard (the asterisk) to do so. *Nix was developed in the late 1960’s. AT&T Bell Labs developed Unix at around the same time. hrough various iterations and developments, Linux was also born. The result of these parallel innovations is that once you learn how to perform installations on one server via the command line, you’ve learned a skill that’s likely compatible with many other tasks on a variety of Unix or Linux servers.
Man Pages – Information at Your Fingertips
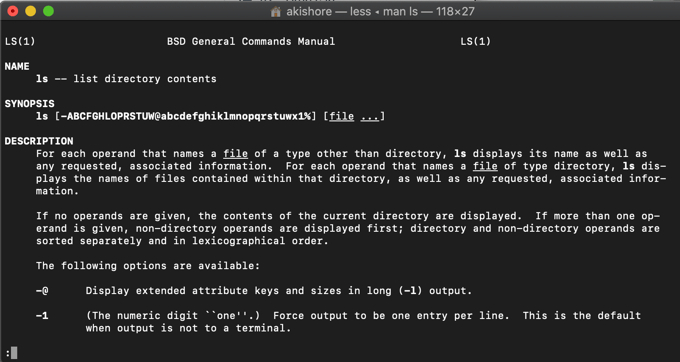
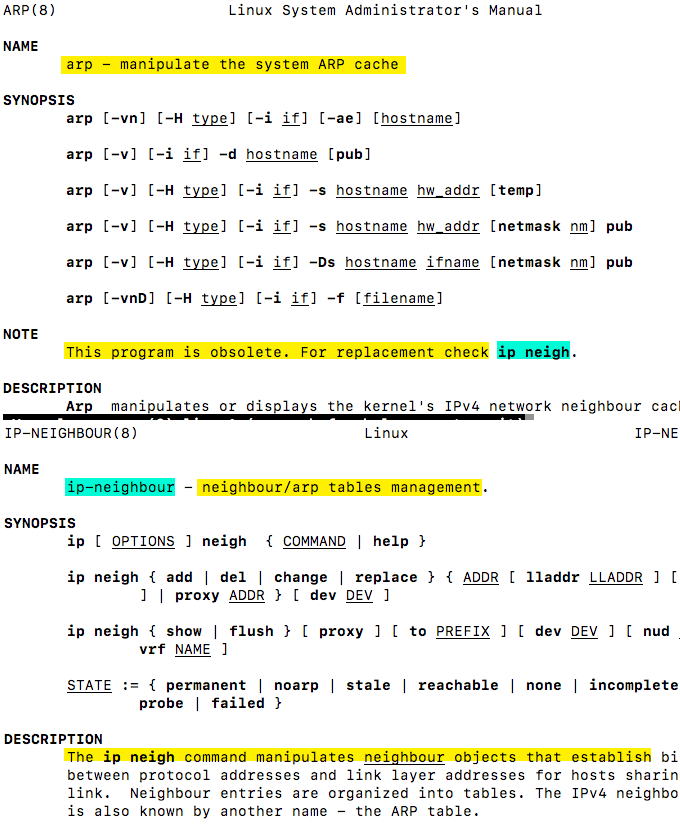
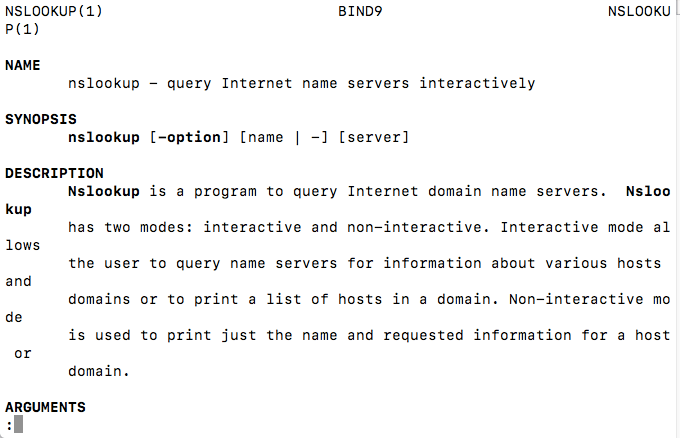
Much like Google, Linux has its own set of search and research tools that enable users to find the resources they need. Those resources are known as, “man pages.” When you are logged into a Linux server (or Linux-based operating system), you can open the command-line application and type in what you would like to research, like typing in a search term in an interactive documentation file. If you pick a topic you want to research, like a Linux utility, tool, daemon, script, you can look that up by typing “man” and then the word. You will learn how to do this later in this article. Man pages are easy to use. Just start typing a couple of words and the Linux OS will begin returning the information to you. If there’s no man page for a particular topic Linux will tell you that. For the most part, man pages are reasonably accurate for the software version on which they appear. For example, if you are logged into a Linux server that’s 10 years old, the man page displays information relative to that version (and age). Man pages are easy to use and accurate, but there are a couple of caveats. Let’s illustrate those caveat(s) via images. In the image below, the man page for ARP indicates that ARP is obsolete (under the “notes” section) and that one should look up ip neigh instead. It would seem, by that notation, that one may want to type “man ip neigh” to access information about the replacement tool/protocol. However,, typing “man ip neigh” does not look up the man page for “ip neigh”. Instead, it’ll look up two man pages… one for “ip” and the other for “neigh.” While it’s true that you’ll get a man page if you type “man ip neigh,” unless you are paying close attention, you may miss that it’s not actually what you were looking for. You could add a dash (even though that isn’t what shows in the man page when referencing the replacement tool)… So, if you add a dash and type “man ip-neigh” that also works fine but it isn’t correct either. You might try typing “man ip-neighbour” (note the British spelling). When you type that particular phrase, you’ll see the correct man page for replacing the ARP man page (or replacing the ARP protocol). The bottom line is this: If you can’t find what you need, try using different combinations until you get the desired man page. As an example, try looking up the man page for the nslookup tool. You do this by typing “man nslookup”. When you do that, you’ll see a man page that looks similar to the image/screenshot below. You’ll learn all you’d want to know about the nslookup tool. After the man page pops up on your screen you can scroll down, read, apply, test, and even close out the man page (by typing the letter “q” and letting the man page automatically close). If you request a man page that doesn’t exist, Linux will provide you with the feedback that there’s no entry for that man page and to try another one.
IPv4 and IPv6
Both IPv4 and IPv6 are technically the same, but they don’t appear the same to us humans. They’re a means of identifying machines or devices on a local area network (LAN). They’re private in the way that they identify the devices in the LAN. IPv4 uses numbers separated by dots/periods. Most of us are familiar with the type of IP addresses we see for computers connected to our private networks using the IPv4 format. Computers on a network also have an IPv6 address, but it looks different. IPv6 is composed of alphanumeric characters separated by colons ( : ). So what are the differences between IPv4 and IPv6? Think of it like a network name. One is like the first name and the other is the last name. Both names point to the same person (or in this case, a computer). Just as we generally have a different first name compared to our last name, the IPv4 “name” will be different from the IPv6 “name” even though they both point to the same machine. Carla Schroeder has written an easy-to read and useful article about IPv4 and IPv6.
Root Access on a Linux Server (and su and sudo)
For many of the tasks that need to be completed, root access (a.k.a. Administrator or superuser) is required. That’s because many of these utilities and apps are sensitive enough that they’re restricted for security reasons. An alternative solution to logging in as root or triggering superuser access (su) is to prepend a command with “sudo” telling the Linux machine that that particular command needs to be run as superuser/root, but that subsequent commands do not (unless also prepended with the “sudo” directive). In cases where “sudo” is used and prepended to the command, Linux will request the su password in order to authenticate the superuser identity and permissions.
Networking Protocols
there are many different protocols to consider when discussing Linux. The two protocols that are primary to this article are TCP and IP.
Transmission Control Protocol (TCP)
Transmission Control Protocol, more often referred to as TCP, is a protocol used for the transmission of packets, just as the name describes. See below for an explanation of various tools, including the Linux tool called Traffic Control (tc). TCP directs the Linux operating system on how packets should move from one place to another. It also controls network traffic and directs the transmission of packets of information (like folders of data moving from one place to another). This is why the protocol is called Transmission Control Protocol (TCP).
Internet Protocol (IP)
Internet Protocol is commonly referred to by its acronym, IP. In the case of the IP you have a wider area (the Internet) to transmit packets. It’s like having a wider, longer, and more travelled super highway… called the internet. While TCP controls the movement of packets across a network, IP controls the movement of packets across the internet.
ICMP Protocol
ICMP stands for Internet Control Messaging Protocol. While it’s a protocol that’s available in most Linux distributions, it may not be available on all Linux distributions. This was evidenced by the lack of a Man page within a current Centos installation. At first glance, it may not seem like this particular protocol is that essential but in reality it is. ICMP is responsible for providing error messages if/when a packet doesn’t properly reach its destination. ICMP is essential for receiving status updates on the delivery (or receipt) of the packets of information being transmitted.
User Diagram Protocol (UDP)
User Diagram Protocol (UDP), like Transmission Control Protocol (TCP), is a protocol for the transmission of packets of information from one point to another. In the case of TCP, as a part of the process/transmission, there’s a verification of successful delivery of the packet(s), making it more reliable than UDP. In the case of UDP, there’s no verification process so you won’t know whether the packets were transmitted or received successfully and without error. As such, it’s an easy enough protocol to utilize but it’s not verifiable or able to be authenticated.
Linux Configuration
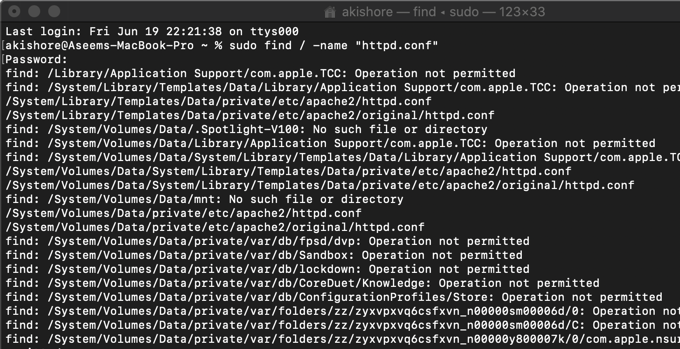
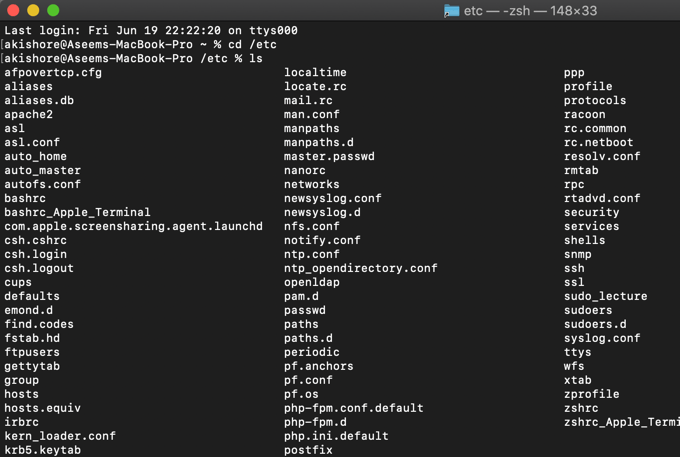
There’s several configuration files available in the Linux operating system. For example, if you’re running an Apache server on your Linux machine, the Apache configuration files are important. Those files let the Apache web server know what’s going on with the domain and more specifically, the site that’s hosted on that server. Sometimes the configuration file is labeled as httpd.conf. Sometimes it’s labeled as apache.conf. Or it could be a completely different label/name. You may find the configuration files in one location on one server, and other times they’re in a completely different location on another server. Fortunately, there are helpful commands that may assist in locating specific configuration files. For example, you can type the following to locate the “httpd.conf” configuration file, if it exists: The first word, “find”, let’s Linux know what command/utility you’re using, which in this case is the “find” utility. The second component of the command line is the “/” which lets the find utility know that it should be searching the path starting from the root level of the server. If you were looking in a more specific location, you may have something like “/etc” to let Linux know to start in the etc directory and follow that path. By providing a specific path/location, you can potentially speed up the process, because Linux doesn’t have to search in places that are redundant. The “-name” option lets Linux know what you’re looking for in the name of the file or directory. It’s helpful to include the name in quotation marks, and you can also use an asterisk ( * ) as a wild card when searching. Some examples of configuration files and directories in the “/etc” directory/path include:
pam.d – a directory that contains utilities related to authentication modules. “Su” and “sudo” are found there, as an example.sysconfig – a directory that includes functions of the computer, like power management, mouse, and more. resolv.conf – a file that aids in the functionality of the domain name server, if the Linux machine is being used in that capacity.services – this file contains the available connections (i.e. open ports) available on the Linux machine.
If you’re wondering if any files, paths, or utilities are obsolete or deprecated, use the man pages to check. This is a helpful way to keep tabs on what is current and what has changed.
Understanding the Linux File System
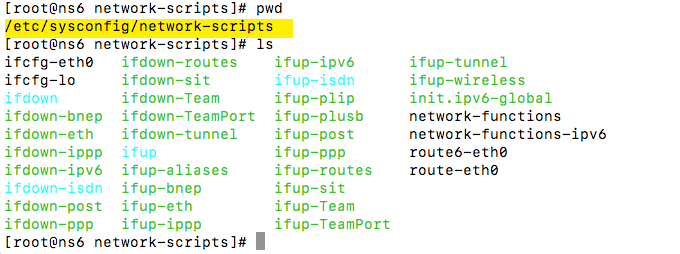
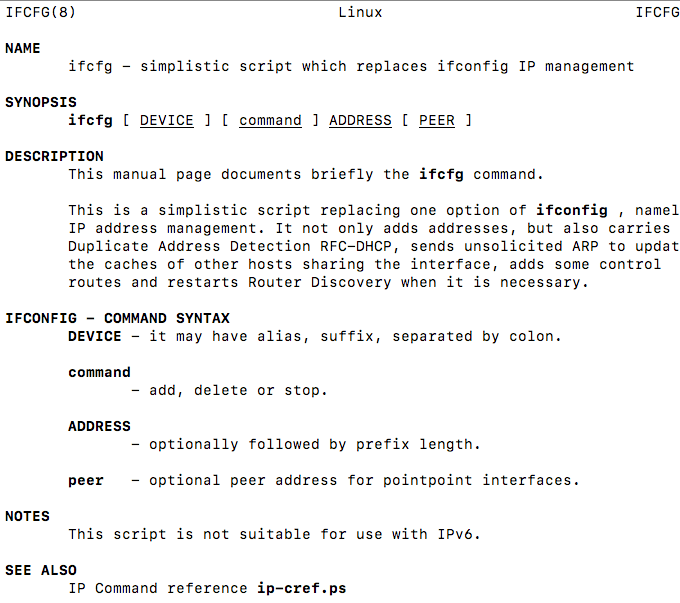
In many Linux distributions, configuration files are found in the network-scripts directory under the “etc/sysconfig” path. If they’re not located there, it’s likely that there’s a similar location/path. The files that are present in this particular case are shown in the screenshot below. As you’ll see in the screenshot below, there are two configuration files. Each of them are labeled according to their respective interfaces (i.e. ifcfg-eth0). The configuration files are preceded by “ifcfg” which replaces the ifconfig command (as well as becoming a part of the interface file name). That said, it has now been somewhat replaced as well since the ifcfg is not compatible with IPv6. The two interfaces references (ifcfg-eth0 and ifcfg-lo) refer to specific types of interfaces. Linux developers were helpful in this area, providing definition and direction in the form of file names. In the case of the interface ending in “eth0”, it’s an interface that’s connected via “ethernet” or has ethernet capability. The use of the letters “eth” point you in the right direction. The number that follows “eth” provides the number of the device. So, the next ethernet device may be something like “ifcfg-eth1” and so forth. The file name that ends in “lo” refers to a “loopback” interface. It’s also referenced as the “localhost.” This is a network connection that isn’t technically a real network connection. It simply allows processes to communicate on the device without communicating over the network. Think “virtual” when thinking about this particular interface. All Linux distributions are capable of having a loopback (or localhost) and are usually set up for one by default. They use an interface that ends in “-lo.” The IP address for the localhost is usually 127.0.0.1. In many cases, the loopback virtual interface can be used to test connections and rule out other potential network issues.
The Files
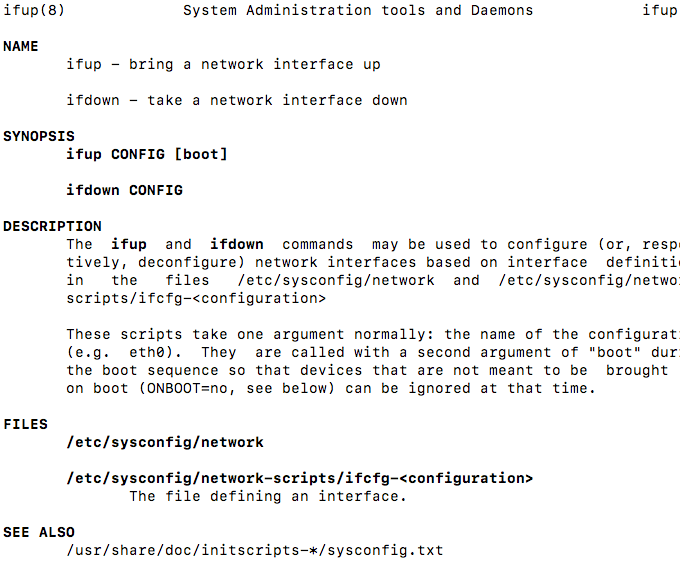
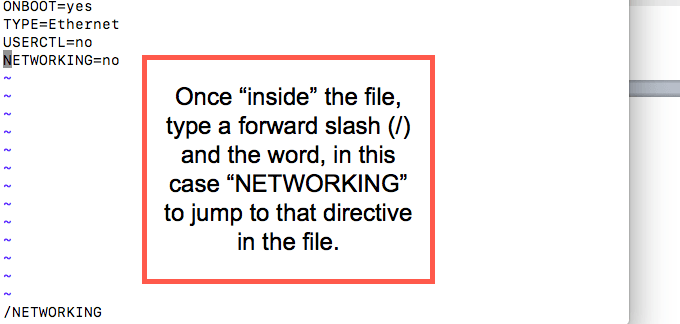
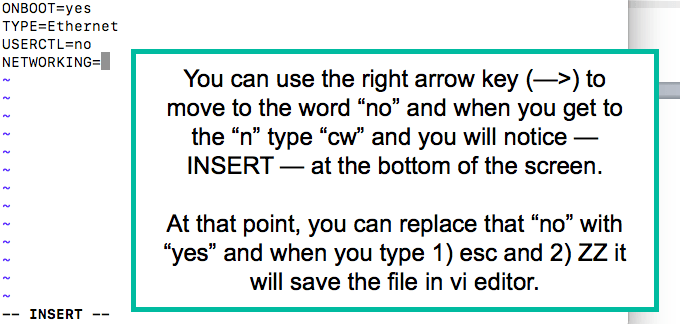
There are different ways to edit configuration files (as well as view them). One method is to use the “vi editor” that’s accessed via the command “vi” followed by the filename. In this case, when one types “vi ifcfg-eth0” (without the quotation marks) they are able to view the network information for that particular interface (eth0). However, it would be more advisable to do it the traditional way and follow the network configuration instructions found in the man page for ifcfg. This may also be easier for the non-technical person. Using the vi editor does require a bit of attention to detail so if you’re detail-oriented (or you’re already a programmer or system administrator) the vi editor may be an optimal solution when working with Linux configuration files. In accessing the man pages, we’re able to review information about the ifcfg script that replaced the ifconfig script (as shown in the above screenshot of the man page). Also, when looking at the list of interfaces in the Linux distribution, we notice the ifup and ifdown commands. Those, too, can be reviewed in their man page(s). A screenshot of the man page is shown in the image below. As you will see in the man page, there’s additional Linux configuration files (and the paths to get to those files) that can be consulted (and modified) in the set up and configuring of the TCP/IP files on Linux. If you use a command-line text editor like the vi editor to view the configuration file, you will notice some options that are defined. For example, in looking at the network interface, you may see words in all caps, followed by an equals sign (=), and then another word. For example, there may be a directive that’s “ONBOOT” and it may say “ONBOOT=yes” as an example of a configuration option. There’s several other configuration points and options as well. For example, another one is NETMASK. If you see the configuration directive, “NETWORKING,” it should be followed by a “yes.” If it’s followed by “no” it may represent a problem because that would indicate that the network interface is not activated for networking. Here is a step-by-step process to correcting the situation just described: The following are some images that help to illustrate the steps in the above list. Step 1: Step 2: Tip: Keep in mind that nothing in the server world is singular. For example, you may change the configuration for a particular interface (in this case eth0) but that may be just one interface on a network and may be affected by (or affect) another server. So, in the example above, by restarting the server, it will trigger network devices to also restart. This is not the singular option for this interface but this interface would be affected by a command to restart.
/etc/hosts File(s)
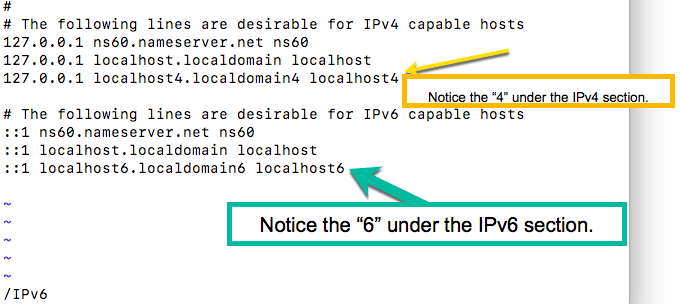
The /etc/hosts file may or may not exist. If it does exist, it may or may not be used in the configuration. For example, you may have a different system that handles host configurations, rather than managing the file directly. Also, the hosts file itself varies. For example, IPv4 and IPv6 handle the configuration differently, as you can see in the image below.
Configuration Files; Locations/Paths; Terms; and More
Some additional helpful filenames and file locations are:
/etc/sysconfig/network-scripts/ (configuration file path)/etc/sysconfig/network-scripts/ifcfg-eth0 (configuration file)/etc/hosts (configuration file)/etc/resolv.conf (configuration file with nameserver information)
In many cases, system or server software creates the configuration files automatically. Also, if DHCP is used, there are other aspects of the networking configuration that are calculated on-the-fly, since static IP addresses are not used in that case. The following command-line (CL) commands were (or are) used in most Linux distributions. Where they are obsolete or deprecated, the replacement command is listed.
route (obsolete / deprecated): Was used to show and edit routes. Replaced by ip route.hostname: Used to display or amanipulate and edit the hostname of the machine. netstat: View network connections, routing tables, interface statistics, multicast memberships, etc.arp: (obsolete / deprecated) Used to be used to show IPv4 information; specifically the network neighbor cache. IPv6 has become the network address, replacing the IPv4 collection of four numbers separated by periods. In light of these changes, this obsolete command has been replaced by ip neigh.ip: Not only does IP stand for “internet protocol” and the ultimate WAN (wide area network”) but it’s also a utility that allows the system administrator or computer user the ability to view the TCP/IP parameters as well as setting them as needed.tc: This stands for “traffic control” and is a utility to help with managing the inbound and outbound traffic on the Linux machine.
Configuration Tools: GUI Vs. Command Line (CL)
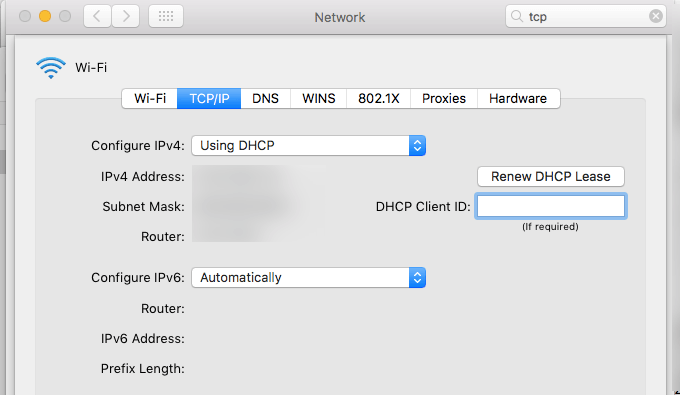
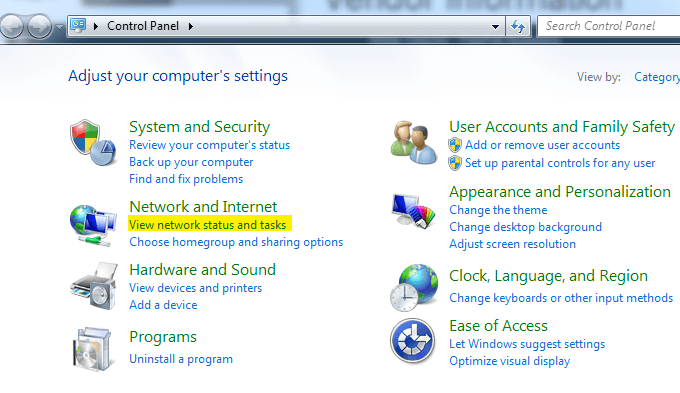
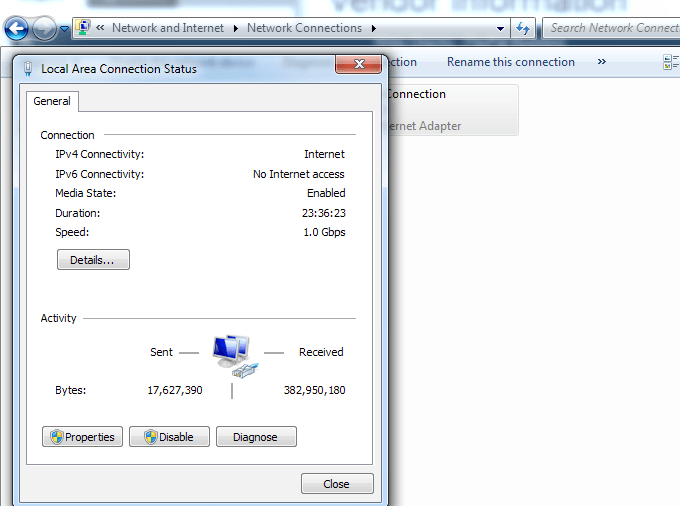
To provide a point of reference, the following three images display a graphical user interface (GUI) mechanism to handle the configuration of networking, including TCP/IP. The first image is the Apple Mac GUI (System Preferences > Networking) and the second two images are that of the Windows Operating System (though it varies from version to version). It’s accessed via the Microsoft Control Panel and Network Connections, as you can see in the screenshots.
Pros and Cons of GUI Versus Text Editor or Command Line (CL)
While many people prefer graphical user interfaces (GUI) because of their ease of use, visual presentation, and overall simplicity, it’s helpful to understand configuration files (in this case related to networking) so that you can troubleshoot and correct any issues. You may want to grab the GUI first but it helps to be fully informed… just in case. Also, there’s some operating systems that do not necessarily have a GUI (or don’t have one yet) so again; it’s helpful to be prepared. In the next section we’ll cover configuration files and how to access them, update them, as well as the management of the files and utilities.
Linux Command-Line (CL) Tools, Utilities, Scripts, and Daemons
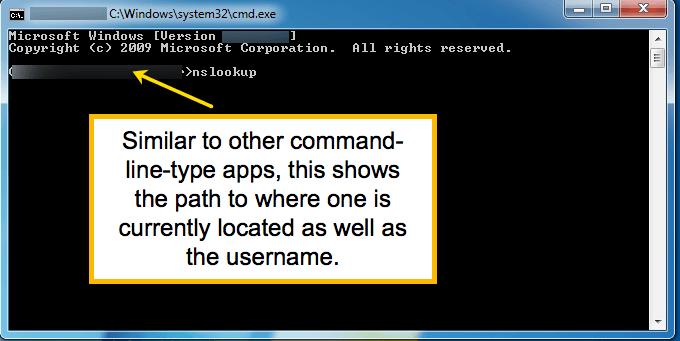
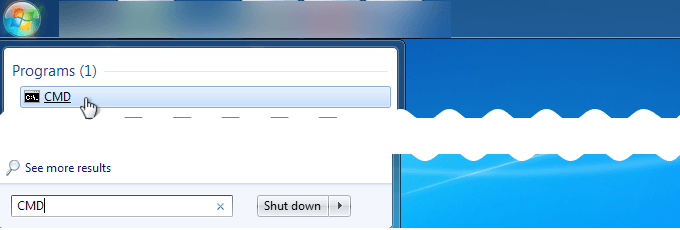
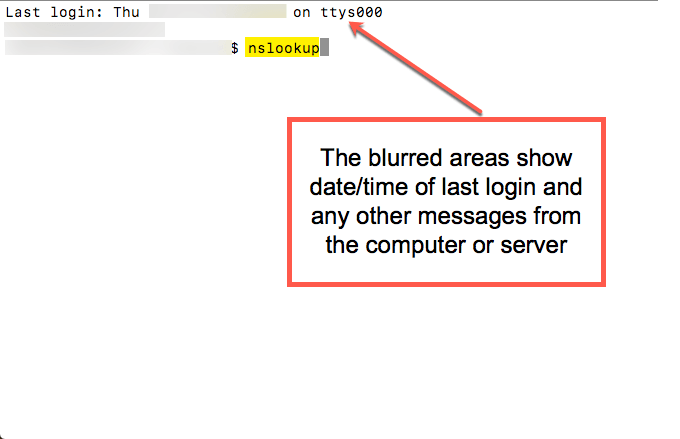
There are many tools that are available for Linux distributions. Again, like other commands there are similarities (and differences) between how those tools are used in the different distributions. In some cases, tools are available but need to be installed first, and the installation process often varies. The command line tool is often referenced as shell and in the early days, terminal. There are other terms for it but generally, it’s an application that allows the user to access operating systemsby typing commands in a window. Let’s look at a couple of examples. The first one is from the Windows operating system and likely looks familiar to Windows users. The tool is openedby typing CMD (as shown in the screenshots below). The second screenshot is that of an application called Terminal that comes pre-installed on most Apple computers.
NSLookup (nslookup)
In the case of nslookup, the ns stands for nameserver and the lookup portion of the command is a “look up” of information. So, what the name of this tool is telling us is that it’ll look up information generally available via a nameserver. NSLookup is a handy tool. In this case, we are using it to look up information about eBay. In order to do so, we type “nslookup ebay.com” and we’re presented with information that’s similar to what’s shown in the image below.The command is displayed at the top of the screenshot (after the blurred out private information). Then, the output from that request (the nslookup) is shown below that, with information such as Server (the public IP address), the specific IP address, etc.
Traffic Control (tc)
Another tool is the “Traffic Control” tool (also referred to as “tc”). It’s a tool that allows the scheduling and processing of data packets. The command tells you how the packets move over a network. That how aspect includes the answers to questions like timing, speed, devices, and more. Here is a command line (CL) representation of the use of Traffic Control (tc): While it might look like “gibberish” to some, each word in the command line represents something important. Here is the listing:
tc: This is the tool, in this case “Traffic Control” (a.k.a. “tc”). This tells the command line application/software which Linux tool to use.qdisc: This abbreviation stands for queuing discipline and is another way of describing a simple scheduler.add: Since we are building a configuration (yes, technically a file), we are telling the tool that we are adding to the controls.dev eth0: The “dev” refers to the “device”, letting the tool know that we’re about to define the device. The “eth0,” in this case, is the reference to the device. You’ll notice that this is similar to what appears in a graphical user interface (GUI) for a device label.root: This tells the tool that we are modifying the outbound traffic from the root level, or egress.netem: This word represents the phrase, “network emulator”. While it may not be the hardware network, it’s emulating the same. This is similar to how the Parallels software emulates the Windows software for Apple computers. Granted, it’s a completely different piece of software but is emulation software in the same way that netem is emulating a network. In this case, netem represents a WAN (wide-area-network) as opposed to a LAN (local-area-network). delay: This word tells the tc tool that we’re modifying the “delay” component of the transaction.400ms: We have already told the tool that we’re affecting the delay, but now we need to define how much we are affecting the delay. In this case, it’s by 400 milliseconds.
Network Manager
The purpose of the Network Manager is to simplify and automate your network configuration. For DHCP users, the Network Manager can obtain an IP address, supersede default routes and automatically swap out nameservers. The nmtui tool for using your Network Manager is available in most, though not all, Linux distributions. Also, keep in mind that some tools are “available” and yet not available. In other words, there are some tools and daemons that need to be installed and do not necessarily come pre-installed on the Linux distribution in question.
Other Networking Topics
There are many aspects of networking and TCP/IP that are particularly fascinating, especially when dealing with a Linux distribution. Don’t forget that you have manual pages (a.k.a. man pages) available right within the Linux installation. So, while this may appear to be a sort of unrelated list of what you shouldn’t do, you can always use a man page to figure out what you should do.
Linux as the Router
These days, most people use hardware that’s dedicated to the task of routing (i.e. router) to manage the network route task. Many times, that’s because routers are a part of the package deal with home or office internet packages/contracts. The customer is usually caught paying a rental/lease fee per month (or annually) or having to purchase the router. However it’s handled, there’s little need for Linux to operate as a router even though it’s capable of functioning as one. The scenarios described above create an almost pseudo-deprecation situation for Linux, but that doesn’t mean Linux is out of the game entirely. It’s possible to set up a Linux server as the hardware (and subsequent software) router if you need to.
IP Route (Formerly “Route”)
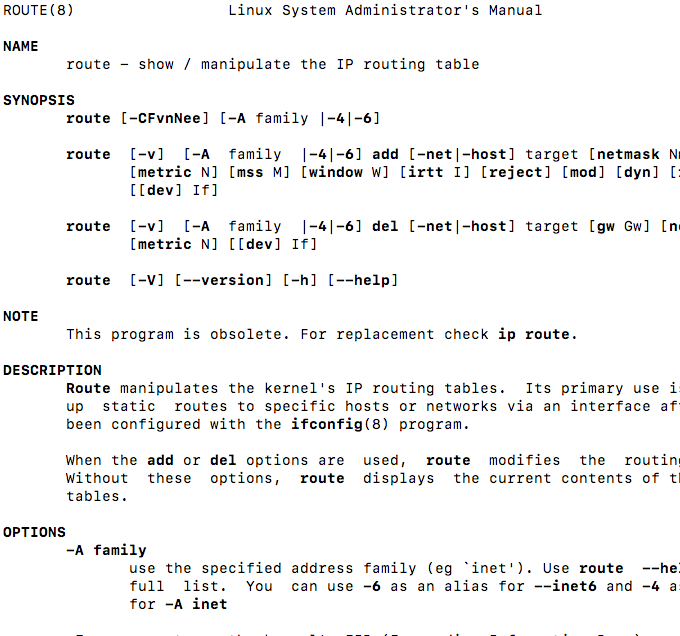
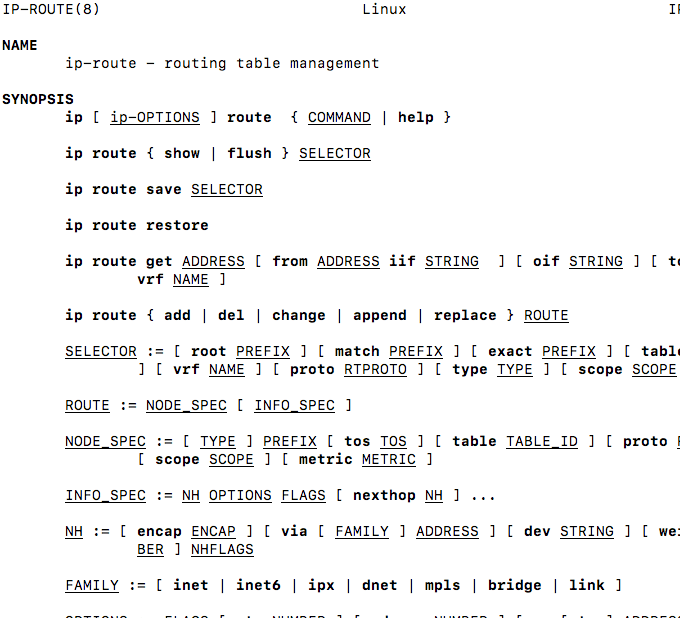
The following image shows a screenshot of the man page for “Route” and the directives that are possible with that tool.
SNORT – An Intruder Detection System
Snort Software is an open source Intrusion Detection System (IDS) originally developed by Martin Roesch and since acquired by Cisco Systems. It operates on the basis of rules that utilize the TCP/IP layers of the network. Defining those rules identify intrusions to protect a network.
How to Set Up Linux > TCP/IP Settings for Linux
The following mini tutorials will help you with some common tasks that you may come across in the Linux world. Keep in mind that times change quickly, so it’s helpful to use your man pages as well as searches in Google to verify the following steps and ensure that there aren’t any other tools that may do the job better. As of the writing of this article, that’s not the case.
Tutorial 01: Assigning a Static IP Address to a Linux Machine
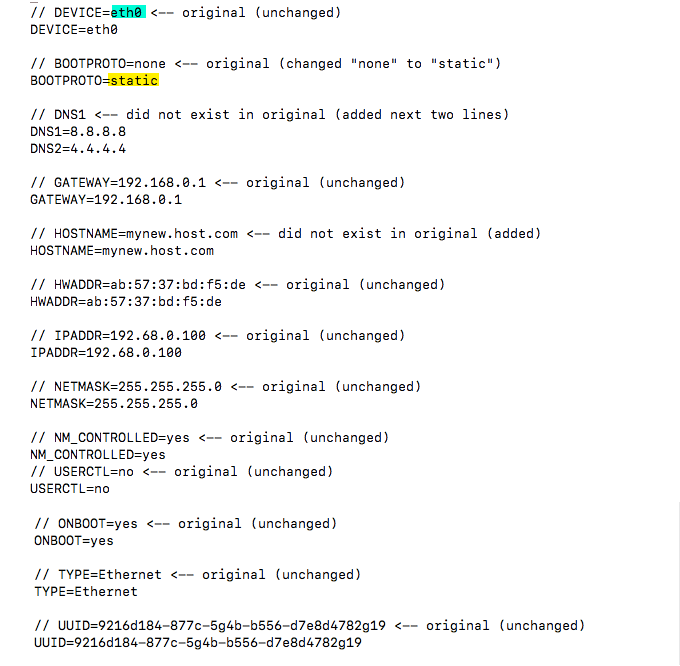
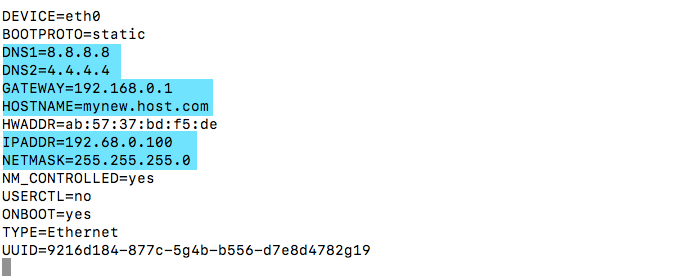
The first question you should ask is whether or not the computer/server needs a static IP address (one that does not change) or a changeable IP address (like DHCP – Dynamic Host Configuration Protocol). If this is your personal computer (not a server), the chances are you may be using DHCP for your access to the internet. What that means is that you don’t have to mess with assigning a static IP address to your computer. Your internet service provider (ISP) and any hardware provided/leased is automatically calculating an IP address on-the-fly to enable you to connect to the internet. In other words, if you don’t need a static IP address, a dynamically changing one is just fine for your non-server computer. If you have a server and you need it to be accessible to others (i.e. outside your home; a WAN/internet; non-LAN) then you will need a static IP address so that either the domain that you are using is mapped to it via the hosting nameserver assigned to the domain, or accessible directly via the static IP address. If no one needs to access your computer or server outside your home, then a changing IP address (dynamic; non-static) is just fine, because no one is using a static IP address. Note: Some people have used a DHCP IP address for public access (yes, even as a server) but, If you do need a static IP address, then go ahead and follow the steps here. If not, you can skip this section. As you will see, the command (shown above) includes “sudo” at the beginning of the line. While it’s possible to use the “su” command (superuser) and log in as the superuser, the use of “sudo” only runs that one command as superuser. The other method, logging in as superuser, allows all tasks to be completed as superuser, making it more convenient to do what needs to be done. However, along with that comes a security risk, which is why it’s safer to simply start the command with sudo and allow the app to request a password (as needed) to complete the command as superuser for that task/command. The choice is yours and should be based on whatever method is easier. The file represented by the screenshot below is accessed via the following command: Prior to using that command, the network device number is verified ( eth0 ) to ensure that it’s correct. As you recall, the Linux configurations are managed within the file for the interface so it’s essential that the interface number is verified from that file prior to editing the configuration file. Another aspect of the configuration file to take notice of is the use of the word “static.” Since we are adding a static IP address, it’s important to let the configuration file know that that’s the case. The notes were added in the screenshot below for illustrative reasons, but should not be included in your configuration file. Also, in some Linux distributions, quotation marks are required. In this particular configuration file, no quotation marks were present in the auto-created configuration file so that trend was continued and no quotation marks were added. The following screenshot shows how the file would actually appear, with the notes and extra spaces removed. The next (and final) configuration file to be edited is accessed by typing: Within that file, the nameservers can be added (or modified). Those nameservers should match the other configuration file that was just modified. In this case, at /etc/sysconfig/network-scripts/ifcfg-eth0 (the screenshot above). The verbiage that will be used is “nameserver.” So, where the device configuration file shows DNS1=8.8.8.8, the resolv.conf file should show nameserver 8.8.8.8. The counterpart of DNS2=4.4.4.4 would show as nameserver 4.4.4.4 in the resolv.conf file. Loosely put, the steps above work on the Red Hat Linux distribution, but there’s no guarantee that it’ll work in the future, with the technology changes that occur. This is why configurations should be tested and verified. Once the configurations have been completed, restart the network interface with the preferred method as described above. This will apply the changes. It’s also helpful if the static IP address is tested. You can do this by attempting to connect to that public static IP address from another device (preferably on a different network). You could also call a friend or associate and have them attempt a connection to the static IP address from another geographic location (and different network).
Tutorial 02: Network IP Aliasing
It’s possible to assign more than one IP address to one network interface card (NIC). This is called Network IP Aliasing because only one IP would be an actual one, so the additional IP addresses are aliases to the same card. In order to assign the IP address, use your favorite method of assigning the IP address as described in Tutorial 01. It isn’t that it has to be static, but in order to have multiple IP addresses assigned using Network IP Aliasing, one has to assign IP addresses using a static IP.
Tutorial 03: Change Host Name of the Linux Machine
Use the following steps to change the hostname of your Linux machine using your preferred editor:
- Modify the hostname configuration file by typing the following in the command line app: Wherever you see the old host name in that configuration file, replace it with the new host name.
- Modify the hosts configuration file by typing the following in the command line app: Wherever you see the old host name in that file, replace it with the newly chosen/designated host name in the same way that you did with the hostname configuration file in the above step one.
- Restart the server or Linux computer. One method to do this (depending on your Linux distro) is to type the following in the command line app: This restart is needed in order for the changes to take effect.
Tutorial 04: Enable and Disable Your NIC
One of the more fascinating things that you can do via the command line in Linux is to enable or disable your Ethernet connection. To do this, type the appropriate command from these two: With older versions of Linux, you could run ifconfigup or ifconfigdown, but it’s possible that those commands are deprecated or obsolete within newer Linux distributions. In that case, the newer ip command is preferable.
Tutorial 05: Enable Network Forwarding
Your Linux operating system is capable of connecting a variety of networks and can act as a router. All you need to do is uncomment the net.ipv4.ip_fporward=1 line which will enable you to forward the IP address. The necessary configuration file is normally stored at /etc/sysctl.conf: For examples on how to set it up take a look at “How to enable IP forwarding on Linux (IPv4 / IPv6).” If you’re setting up a Linux server using DHCP (instead of a static IP address) you can opt for a form of network forwarding. This is not common, but referenced here because it’s doable and it represents a case where someone may be inclined to do so.
Tutorial 06: Remote Commands Via Shell
In the case where you need to access a Linux server and that server is not geographically located in the same place as you, you may need to use remote commands to access that remote Linux server. For those who are programmers or system administrators, “remoting in” to a server is a normal occurrence. One of the most popular ways to do this is to use the “ssh” command, letting the command line app know that you want to securely access the Linux server, even if you are doing so via an insecure connection. In addition to the use of the “ssh” command, you need to provide information of where you’re connecting and how (among other options available). You may use a domain name for the Linux server access or even a public static IP address. The name or IP address tells the ssh command what it’s accessing and where to find it. Other options may include the username that will be used to login to the remote server. Without that option defined, it may be requested but it’s also an option to define it at the same time as the ssh command. For example: The password may also be configured into the command but it’s recommended, for security reasons, that you enter that at the time of the connection with the remote server. Why? If the password is typed into the command, in plain text, it can be accessed by the next person using that same computer and they would have access to the password. For additional security reasons you may want to access the Linux server via a specific port. By designating a port that may be used, you can block other ports and prevent hacker attempts or DOS (denial of service) attacks. There are many different configuration points for ssh. Some of these are listed at shellhacks.com.
Tutorial 07: Network Monitoring Tools
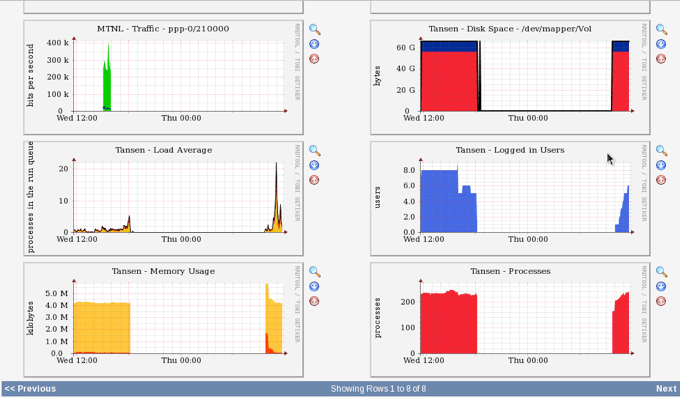
One important component of managing a network is verifying that everything works and continues to work. You can do this through network monitoring. Tools that accommodate network monitoring vary but ultimately accomplish similar goals and objectives. One such network-monitoring tool is Cacti. Cacti is an open-source network monitoring tool. Cacti monitors the network and provides graphical representations of what has been logged. This helps users (especially newbies) to identify where there may be issues. The front end can accommodate plenty of users and is sometimes used by hosting services to display real-time bandwidth information and other data in the following graphs.. Data can be fed into Cacti via any external script or command. Cacti will bring the data together via a cron-job and fill your MySQL database before presenting it as a front end user graph. To handle data gathering, you can feed cacti the paths to any external script/command along with any data that the user will need to “fill in”. Cacti will then gather this data in a cron-job and populate a MySQL database. Cacti is a useful tool for network administrators who want to monitor network use and provide easy-to-understand visuals to consumers. Cacti can be downloaded for free at cacti.net. The website includes documentation to install and configure the network monitoring tool. Alternatives to Cacti you could try include, Solarwinds NPM, PRTG and Nagios. Solarwinds will support SNMP as well as ICMP/Ping, WMI, Netflow, Sflow, Jflow and IPFIX, to name a few. The pre-built templates, graphs and alerts help you to start monitoring your network quickly. PRTG provides up to one hundred Sensors for free. It has similar features to Solarwinds, plus flexible alerts and applications for Smartphones, tablets, ipads. Nagios has all of the tools you will find in Cacti, but does require a little more configuration. There are plenty of plugins to choose from. It has a solid reputation as one of the oldest network management and monitoring tools. But, you will have to get your hands dirty in the maintenance of its configuration files.
