If you’re a Windows 10 user, you’ll probably notice OneDrive sitting in the notifications area on your taskbar. It’s hard to disable OneDrive, but there are ways to hide it and switch it off if the service isn’t for you, especially if you’re using a service like Dropbox instead.
Why You Should Consider Disabling OneDrive
There are a few reasons why you might want to consider disabling OneDrive. We’ll start with the most basic—control. With every installation of Windows 10, OneDrive is installed and ready to begin syncing your Documents, Pictures, and Desktop folders. Many users may not realize that OneDrive is doing this. By disabling OneDrive, you’re gaining back control of your own files, rather than storing them on a Microsoft-based server. If that sounds unappealing, other cloud storage solutions are available for you to use instead, such as Google Drive or Dropbox, or you can build your own cloud storage to store your files. If that doesn’t bother you, the impact of OneDrive on your system and network resources might. It might seem obvious, but OneDrive uses your internet connection to upload files to Microsoft servers. If your connection is slow, OneDrive file syncing could have an impact on your network performance or use up your data allowance. You should also be aware that the OneDrive app starts automatically and will run in the background unless you disable it. This will have more of a noticeable impact on low-resource PCs, so disabling OneDrive could be a good way to claw back some CPU and RAM usage.
How To Disable OneDrive File Syncing
If you only want to disable OneDrive temporarily, the best option is to pause file syncing. This will stop the OneDrive app from uploading any changes to your local files to OneDrive servers, or from retrieving any changes from your online OneDrive storage.
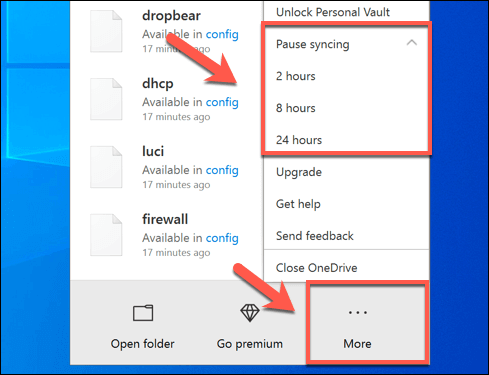
To pause OneDrive syncing, press the OneDrive icon in the notifications area of the Windows taskbar. Alternatively, launch the OneDrive app from the Start menu.
In the pop-up OneDrive menu, press the More button, then click the Pause Syncing option. You can choose to disable it for 2 hours, 8 hours, or 24 hours—click on one of the options to proceed.
To pause file syncing for longer than 24 hours, you’ll need to repeat the steps above to disable it again once the initial 24-hour period is complete. Alternatively, you can stop OneDrive from syncing files from your PC by removing all of the folders that it monitors.
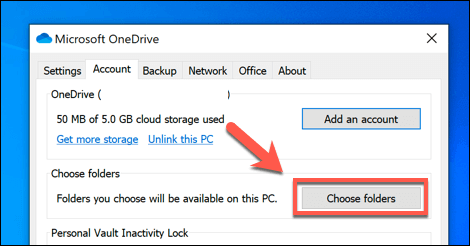
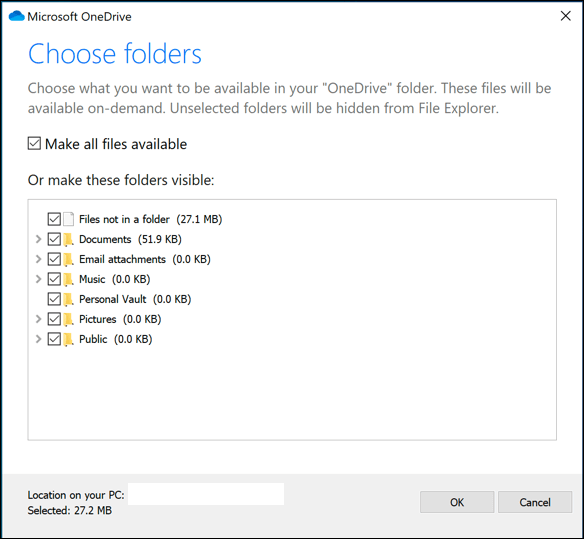
To disable OneDrive file syncing this way, press the OneDrive icon > More > Settings. In the Account tab, press Choose folders.
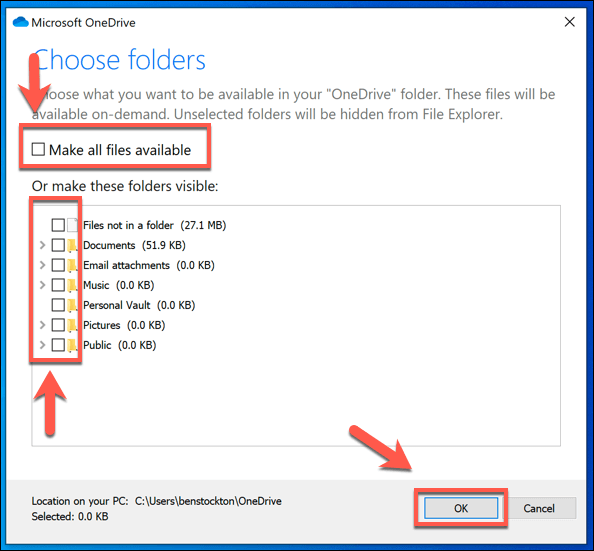
Disable all of the checkboxes in the Choose folders menu, including Make all files available, then press OK to save.
This will leave OneDrive signed in, but it will stop it from automatically syncing files from your PC to your OneDrive storage. You can then stop OneDrive from appearing in the taskbar by disabling it from automatically starting when you sign in to Windows.
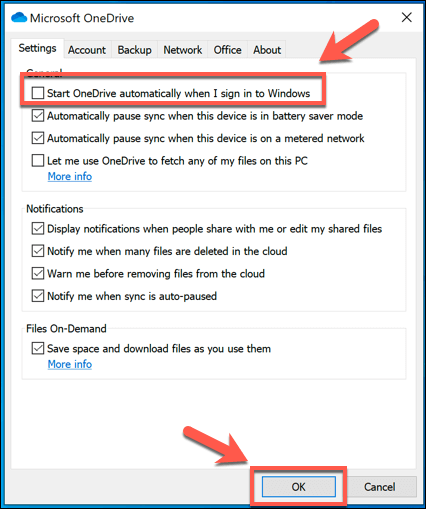
To stop OneDrive from appearing in the taskbar, click the OneDrive icon > More > Settings, then head to the Settings tab. From there, click to disable the Start OneDrive automatically when I sign in to Windows option, then press OK to save.
Once disabled, OneDrive won’t load when you next restart up your PC. With file syncing and automatic start-up disabled, OneDrive is as good as disabled, but you can go even further by unlinking your account.
How To Unlink OneDrive On Windows 10
If you want to disable OneDrive quickly, you can choose to unlink it. This removes your Microsoft account from OneDrive, logging you out and preventing files from your OneDrive account from syncing to your PC (and vice versa) at all.
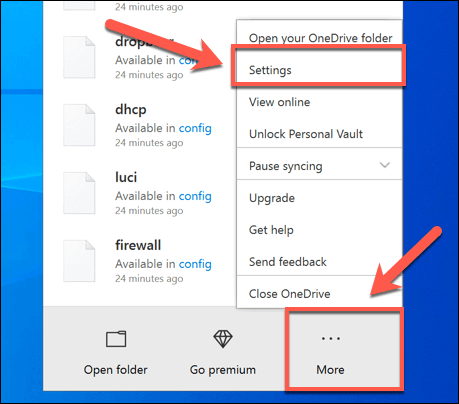
To start, press the OneDrive icon in the notifications area of the Windows taskbar. Click the More option in the pop-up menu, then click the Settings option.
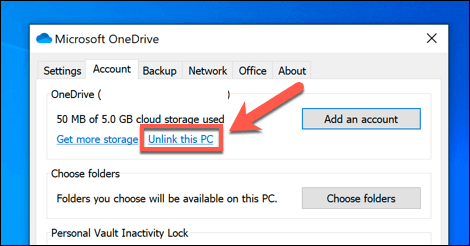
In the Account tab of the Microsoft OneDrive settings window, press the Unlink this PC option.
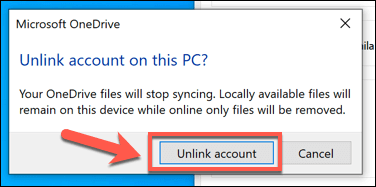
OneDrive will ask you to confirm that you want to unlink your PC from your OneDrive storage. If you’re happy to proceed, press the Unlink account button.
Once confirmed, OneDrive will sign out on your PC. Any files that are currently synced to your PC will remain, but any changes won’t be uploaded to your OneDrive storage—you’ll need to sign back in for this to resume.
How to Disable OneDrive On Windows 10
OneDrive usually comes pre-installed with Windows 10, and some versions of Windows don’t allow you to uninstall it. If the option is available to you, however, you can choose to disable OneDrive completely by uninstalling it from your PC.
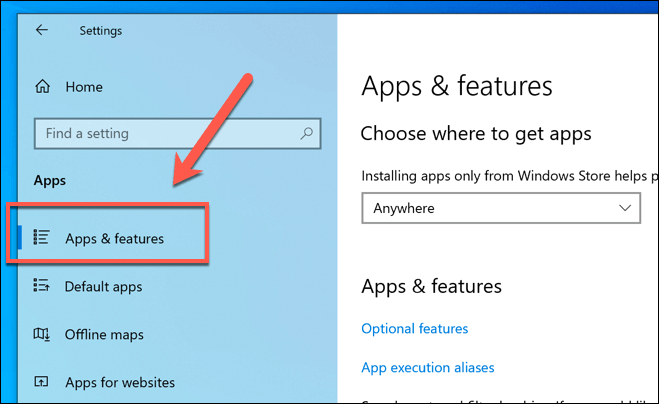
To do this, right-click the Windows Start menu icon and press Settings. In the Settings menu, press Apps > Apps & Features to access your list of installed software.
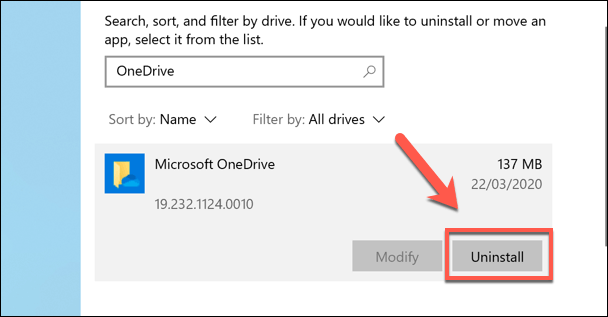
In the Apps & Features tab, locate or search for Microsoft OneDrive, then click on it. To uninstall OneDrive, press the Uninstall option.
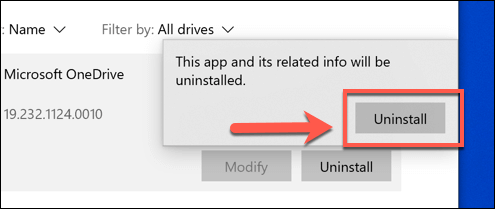
Windows will ask you to confirm if you want to proceed with the removal. Press the Uninstall button to remove OneDrive from your PC.
Using Cloud Storage On Windows 10
Now you know how to disable OneDrive on Windows, you can think about switching to another free cloud storage platform like Google Drive. If you decide to keep OneDrive running, you can backup important folders to OneDrive as a built-in solution for storing your most sensitive files. If you’re having trouble with this built-in Microsoft cloud storage, then you may need to look at fixing some common OneDrive sync issues that crop up from time to time. Whether you like OneDrive or loathe it, let us know your thoughts and recommendations for Windows 10 cloud storage in the comments below.
![]()
